| View previous topic :: View next topic |
| Author |
Message |
loyx
Basic Member

Joined: 12 Dec 2005
Location: New Jersey |
6680.  Posted: Sat Jan 03, 2009 7:13 pm Post subject: Posted: Sat Jan 03, 2009 7:13 pm Post subject: |
 |
|
Can anyone share a guide for making a "matrix style sensor" or any other kind of sensor that mimics the design of the ddr pressure sensor?
Also, has anyone ever used a tapeswitch sensor? I did hear that mymybox attempted to use them and it didn't work out so well but I wanted to hear about any other attempts with using them.
Thanks. |
|
| Back to top |
|
 |
slvrshdw
Trick Member

Joined: 05 Jan 2005
|
| 6681. Posted: Wed Jan 07, 2009 3:07 pm Post subject: |
|
|
Matrix has a website for how to make them with diagrams and stuff.
They are easy to make though:
2 mending brackets, mousepad in between, and screws to hold it down to the pad.
The tapeswitches I think have been used before but I think that there was a small delay in them. Either way, I think they would work, but you would have to figure out a way to turn them into the arcade-style sensor either way. (plus, figure out the lag if there is one)
_________________
|
|
| Back to top |
|
|
ChilliumBromide
Trick Member

Joined: 16 Jun 2006
Location: Beaverton, OR |
|
| Back to top |
|
|
CT_Warrior
Trick Member
Joined: 28 Jan 2008
|
| 6683. Posted: Wed Jan 21, 2009 9:50 pm Post subject: |
|
|
DancingTofu, that looks pretty genius right there. o_o
Do they need occasional maintenance or anything like that though?
I'd think that the sheet metal may bend so that it would always contact the nuts/screws, but I may have just bought very bendable sheet metal. Do you use weatherstripping for your type of matrix design?
Also, does anyone know how much 1/2 inch thick weatherstripping compresses to? |
|
| Back to top |
|
|
Shuma Gorath
Trick Member
Joined: 15 Dec 2008
|
| 6684. Posted: Sat Jan 24, 2009 12:11 pm Post subject: |
|
|
something like this perhaps?
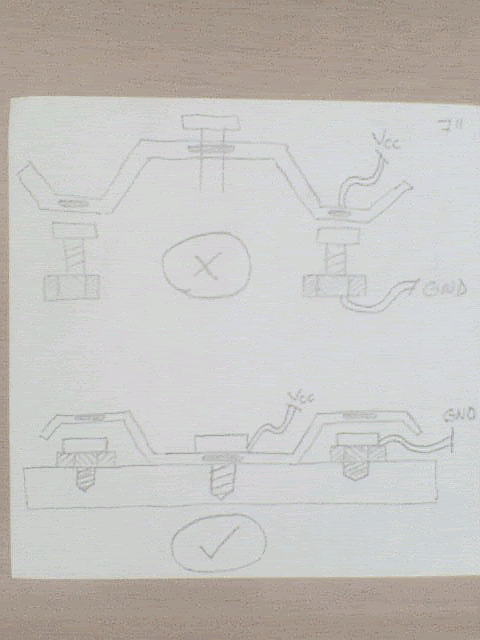
nevermind the upper sketch, its just that I got at first all wrong XD
there is something that bugs me still, its the fact that eventually this sensors will get "flat" and will touch always the other contact, so they're gonna be ON the whole time ;0 also take in count this matter causes more recession in the end.
that and in order to get all the acrylic panels at the right height, all the sensors must be bended the exact way. a bending template would be useful in this case ;0
besides that, its a splendind thinking the one you came out with, DancingTofu.
You have my respect ;D |
|
| Back to top |
|
|
CT_Warrior
Trick Member
Joined: 28 Jan 2008
|
| 6685. Posted: Sat Jan 24, 2009 1:29 pm Post subject: |
|
|
Hahaha, I was really confused at first too because I had it upside down.
I thought about it for a while.
I really wouldn't recommend using screws as part of the sensors, you'd have to unscrew the screws holding the sensor to change the level of the screws, but that can mess up since you changed the height of the sheet metal slightly. You should just use some washers or nuts so that you can change the height without having to unscrew.
It's not really hard to get the acrylic panels at the right height, you just get the highest point of each sensor around the same.
I'm a little bit concerned over the "flat" sensors as well, but I don't think it'll be that much of a problem after some trial and errors. Your drawing is a bit off as you are missing the two crucial side screws. You should raise the screws a little bit higher too, so that when the sensor is pressed, the sheet metal doesn't bend significantly enough to change shape.
Last edited by CT_Warrior on Sun Jan 25, 2009 12:44 pm, edited 1 time in total |
|
| Back to top |
|
|
CT_Warrior
Trick Member
Joined: 28 Jan 2008
|
| 6686. Posted: Sun Jan 25, 2009 12:43 pm Post subject: |
|
|
Okay, so I decided to go with matrix sensors for my pad, but I have some questions I need answered! I decided not to go with DancingTofu's design because I feel like I may have to maintain it at least a few times a year and I'd much rather depend on the compression of foam as a sensor rather than the flexibility of sheet metal for stability.
1) I don't think the bottom mending bracket is necessary at all, what purposes does it serve?
2) How tall in 1/16 inches is the mending bracket. If it's variable, please tell me yours, or someone's you know.
3) How big would you recommend the foam dimensions? As short as possible so that the mending braces still hold straight? Doesn't really matter?
4) If I use something like washers or nuts, how would I make sure they stay in place?
5) How tall should the screw/washers/nuts be if the foam core is 3/16 of an inch?
I'd appreciate it so much if someone can answer. ;_; |
|
| Back to top |
|
|
Shuma Gorath
Trick Member
Joined: 15 Dec 2008
|
| 6687. Posted: Sun Jan 25, 2009 1:18 pm Post subject: |
|
|
hey buddy. well so I built my matrix with lots of trial/error. But in the end came pretty good. These are my suggestions:
1. Yeah, I thought the same. Actually the bottom bracket serves as surface for the mouse pad to sit on, it would be kind of awkward to sit the mouse pad on the wood. Also to conduct electricity through both screws so there are 2 contacts. Without the bottom bracket, you would need to make ground connections for each screw. although you actually can do this with the bottom bracket enabled to increase contact accuracy.
2. I can't help you here because I made my sensors from a big 20 gauge metal sheet. I think my brackets were each 0.8-1.0mm thick.
3. I used two 2.5mm layers of mouse pad for the foam. Also take in count that I used pan head philips screws with one washer for each screw. Then add to that the fact that the acrylic panel weight alone compresses the foam. So the distance between the top of the screw head with the top bracket doesn't need to be that short. Remember also that the foam wears out and the distance will reduce even more with the use.
EDIT: Oh yeah, to give your sensors an extra foam-feeling like in the arcade, put an extra layer of rectangle foam ON TOP of the sensors. That would reduce the graphic wearing from the acrylic panel, decrease the recession, and also reduce the noise ;D
4. Just screw tight, but not that tight so the screw hole get loose. You can shake the washer a little bit with your hands just to make sure it doesn't move with the stomping. Using washers also helps the wire to fasten and stay in place with the screws/bracket.
If by any chance the screw hole gets loose, take the screw apart, put some wooden toothpick in the hole(half a stick is fine), and then put the screw back in the hole with the toothpick.
5. Well, that's the difficult part. You will probably end up buying different sizes of screws just to use only size ;D Take in consideration the facts I mentioned before: Screw head height, foam height, washer/nut height, bracket thickness. Use long body screws so there is enough body of the screw to hold the sensors really firmly on the plataform base of your pad. Remember, these are the parts that will really get all the abuse and stomping over the years, so they need to be as firm and strong as they can get.
You can do a "simulation" of your sensors in a little piece of wood alone to not ruin your entire precious pad ;D
I hope you find my suggestions useful ;D |
|
| Back to top |
|
|
CT_Warrior
Trick Member
Joined: 28 Jan 2008
|
| 6688. Posted: Sun Jan 25, 2009 2:07 pm Post subject: |
|
|
Ahh thanks man! Really appreciate it. ^^
1) I'll drop the bottom bracket because of cost and the extra thickness I can't have.
2) That's actually good info for me, thanks!
3) Hmm, I think I'll have to do it a different way since my pad seems pretty different from your build style.
EDIT) I think it would be better to have weather stripping on the side of the sensors, but slightly higher (it'll compress to same height later), so that pressure is released from the sensor faster. I want arcade accurate recession, but with better than arcade sensors.
4) I was going for washers alone so that I wouldn't have to screw. If I use any screw longer than half an inch, it would go past the bottom of my pad! I decided to go for less than half inch screws so I'm fine here now, thanks.
5) Thanks again, I think I know everything I need to build my sensors with confidence! |
|
| Back to top |
|
|
Shuma Gorath
Trick Member
Joined: 15 Dec 2008
|
| 6689. Posted: Sun Jan 25, 2009 5:57 pm Post subject: |
|
|
| cool then, I'll wait for the results and if you post pics of your pad and sensors then better ;D |
|
| Back to top |
|
|
ninjastyle777
Basic Member
Joined: 28 Jan 2009
|
| 6690. Posted: Wed Jan 28, 2009 8:56 pm Post subject: |
|
|
Hi all. This will be my very first post so please excuse any ignorance I may display. I just want to share an image of where I'm at so far on this project.
After waiting almost 2 years and saving my money for a blueshark, those idiots at MYMYBOX never got their act together, so I decided to just go ahead and spend the money on building my own.

This took all of 2 weekends to do. I should be done with construction and ready for wiring this coming weekend.
I will post again with more images and details when it is done, but in the meantime, I'm trying to come up with a name for it. Any suggestions? I was thinking maybe Shadow Master Dance Platform, Kage Dance Platform (Shadow in japanese), Livid Shadow Dance Platform, Deadly Shadow Dance Platform, Shadow Noire Dance Platform....My imagination's not helping me much at the moment.
Also, I'm going to need to test this thing on the harder levels. Is anyone in the South Florida area interested in helping me with this?
Thank You |
|
| Back to top |
|
|
slvrshdw
Trick Member
Joined: 05 Jan 2005
|
| 6691. Posted: Wed Jan 28, 2009 10:52 pm Post subject: |
|
|
Holy crap, nice looking pad so far!
I like the L aluminum housing on the side; I might have to use that on one in the future...
Few questions:
1) Does the sheet metal bend over the sides at all?
2) Is that mirror finish on that? It looks really nice.
3) What type of sensors do you plan on using?
4) What graphics for the arrows?
As for the name...what for exactly? Like, are you getting a decal or something?
If so, I'd say the Kage one is alright. I'm horrible at names >.>
I like the shadow too, but I may be biased (slvrshdw=silvershadow  ) )
_________________
|
|
| Back to top |
|
|
ninjastyle777
Basic Member
Joined: 28 Jan 2009
|
| 6692. Posted: Thu Jan 29, 2009 6:32 pm Post subject: |
|
|
| slvrshdw wrote: | Holy crap, nice looking pad so far!
I like the L aluminum housing on the side; I might have to use that on one in the future...
Few questions:
1) Does the sheet metal bend over the sides at all?
2) Is that mirror finish on that? It looks really nice.
3) What type of sensors do you plan on using?
4) What graphics for the arrows?
As for the name...what for exactly? Like, are you getting a decal or something?
If so, I'd say the Kage one is alright. I'm horrible at names >.>
I like the shadow too, but I may be biased (slvrshdw=silvershadow ) |
Hey thanks!
Actually I'm just wanting to give it a name like others have given names to their designs. Plus I may be offering to build for others that don't have the circumstances to build their own as I have the ability and facility to produce these fairly quickly.
To answer your questions:
1&2) That picture may be a little deceiving, but that's actually .093" Lexan on top of solid oak for the non arrow panels. So you're seeing the reflection from the clear Lexan.
3) The arrow wells in my design are only .75" deep and the panels will take up .5" of that so I have to keep things pretty simple but effective for the sensors. So I've decided on a custom sheet metal on sheet metal design for now. I'll post pictures of that when it's done. I will leave it open for upgrades though, just in case I decide to put arcade sensors in there.
4) Just a preview. I may change it though...
 |
|
| Back to top |
|
|
slvrshdw
Trick Member
Joined: 05 Jan 2005
|
| 6693. Posted: Sat Jan 31, 2009 2:50 am Post subject: |
|
|
Ah, I see the lexan panels now.
I like the Arrow design, ITG  I think that a black and white would actually look pretty cool. Maybe invert the colors on the Left/Right panels or Up/Down, whichever. I think that a black and white would actually look pretty cool. Maybe invert the colors on the Left/Right panels or Up/Down, whichever.
Good luck.
_________________
|
|
| Back to top |
|
|
CT_Warrior
Trick Member
Joined: 28 Jan 2008
|
| 6694. Posted: Sat Jan 31, 2009 8:49 pm Post subject: |
|
|
| The way my pad ended up, I need to glue the arrow graphics onto the bottom of the Lexan panel. What kind of glue can I use that dries clear, and any tips on applying it? |
|
| Back to top |
|
|
CGRemakes
Basic Member
Joined: 23 Jul 2008
|
| 6695. Posted: Sun Feb 08, 2009 8:32 am Post subject: |
|
|
| slvrshdw wrote: | Matrix has a website for how to make them with diagrams and stuff.
They are easy to make though:
2 mending brackets, mousepad in between, and screws to hold it down to the pad.
|
Do you happen to have a link to that guide? I've tried searching the forum, but haven't had any luck finding it. |
|
| Back to top |
|
|
ninjastyle777
Basic Member
Joined: 28 Jan 2009
|
| 6696. Posted: Fri Feb 13, 2009 7:43 pm Post subject: Finally done! |
|
|
Well here it is! Finally finished. I still need to put some final touches to it, like concealing the Ethernet port a little better, but for the most part it's done.

 
Wiring the sensors proved to be a bigger challenge than I anticipated, but everything turn out perfectly. That first picture links to more pictures if anyone is interested in seeing more.
The pad measures 37"x37" so it's a little bigger than the standard Konami dimensions. It's made of mostly solid Red Oak and Lexan.
Anyways, I want to thank everyone on these forums for all the information that has been posted. My design is pretty much a composite of all the tutorials and information I've found on this site and others.
Thanks! |
|
| Back to top |
|
|
CT_Warrior
Trick Member
Joined: 28 Jan 2008
|
| 6697. Posted: Sat Feb 14, 2009 1:18 am Post subject: |
|
|
Your pad looks great!
In fact, we built our pads very similarly..

The only real difference is the sensors. I haven't finished building my sensors yet, but they're specifically designed for flat-footing.
My first pad has the same weatherstripping your pad has.
I would recommend replacing it with something else immediately, they WILL die on you eventually, and some will get compressed more than others, creating uneven switches.
I'm a bit curious of the cons in putting Lexan over the middle panel. Could you help me with that? I think the Lexan over wood idea is genius! |
|
| Back to top |
|
|
Steinway
Basic Member
Joined: 30 Jan 2009
|
|
| Back to top |
|
|
ninjastyle777
Basic Member
Joined: 28 Jan 2009
|
| 6699. Posted: Sat Feb 14, 2009 5:25 am Post subject: |
|
|
Thanks! You know I did have that concern about my sensors. I was just planning on replacing them with arcade sensors in the future, but what would you recommend? Let me know how things fair with your sensor design.
As far as with the Lexan on the wood...I play bare footed and I haven't really noticed any cons except that you will have to compensate for the added height to the non arrow panels. I used .093 Lexan for mine and if you notice there is a small square piece of it under each corner bracket to even everything out. That worked out great cause it doubles as a cover for my wires. Also, wood is a funny material as it expands and contracts depending on the environment. Some days I'll notice the lexan bowing up a little and on other day it will be really tight on the wood. I did start to just glue them down with gorilla glue, but that started to look ugly underneath the clear lexan. I'm just glad lexan is almost indestructible. It does feel better under my feet than that "over used" sheet metal. |
|
| Back to top |
|
|
|
|
You cannot post new topics in this forum
You cannot reply to topics in this forum
You cannot edit your posts in this forum
You cannot delete your posts in this forum
You cannot vote in polls in this forum
|
Powered by phpBB 2 © 2001, 2002 phpBB Group
|


